Friday, May 27, 2016

Animation Final Exam

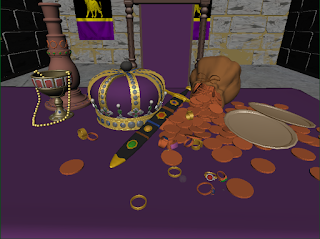
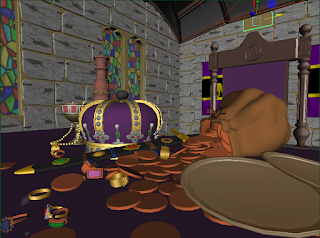
So, this is it. Here's three pictures of the room I edited for the final.


Here's a final render:


And heres an animated playblast:


           The things I changed from the original scene weren't all that crazy, to be honest, Bu I am still proud of it. For starters, I added a texture to the bricks to make them look more stoney, and in between them I put in a simple lambert. I added flags to the background, and stained glass windows. As far as the stuff on the table goes, I just pretty  much painted everything that was already there, Putting phongs on the jewelry, type items and blinns on the metallic ones, in order to emphasize my lighting.  For the lighting, I wanted to go with a sort of orangish type feel, to embody the kingly, riches type feel. I put a dimmer area light in the back of the scene in ordder to make the room look right.To put light on the table, I added an ambient light to the side, and an area light pointing at the items. 

Tuesday, May 17, 2016

Finished animation

Here it is! I won't go too in depth about what I did, because I will be writing an entire essay about it, but overall it was really fun!

Friday, May 13, 2016

I'm more or less done animating my middle aged man. I don't know if I want to color him or not, because that is rather time consuming. If i were to, the pallet would look like that. It's a pretty cool pallet if you ask me.

Thursday, May 12, 2016

Day 10


I've added a new segment with a surprised reaction. I tried to use appeal to make a middle aged man that people would like to look at. I've used the many different stages of a reaction, the anticipation, the rise, and the final setting of the emotion.

Friday, May 6, 2016

day 8

I've now started "dressing" my frame by adding a body and putting a face on my character. After this i will put hair on a different layer so that I can implement a follow through animation

Thursday, May 5, 2016

Day 7

I have now entered phase 2 of the project. This will be a focus on many different facial expressions, and how we can utilize the x and y axis to express this. I've made the frame for a random character i skethed up for this project the other day. This is the flirty expression.

Friday, April 29, 2016

Day 5

I've now made the ball turn into a... humanoid figure. he jumps into the screen and lands on the floor. I've also gone back and colored a bunch of frames.

Thursday, April 28, 2016

Day 3

I went back and made concept art for my character, and started to develop more of a plan for my short animation. I have not decided on an official name, so far he is only codenamed as "Pink Man"

Tuesday, April 26, 2016

Final project

I'm working on my final project now. ;( basically, I have to do a project highlighting a specific aspect of animation and write a paper on it, to show that I've learned more about it. I will be doing an 2-D animation in flash in order to focus on the emphasis of movement, which is something I think I would like to get better at, because it really ties together an animation by presenting things like emotion and exaggeration in a piece.

Thursday, April 21, 2016

Group Project Finished!

This is the outcome of all of our work! It took two weeks, and  a lot of vigorous work, but we got it done and it looks great! The hardest part about this, I think, was trying to deal with all of the lighting and other things that were required to be rendered before we could see it, it chipped off a lot more time then we needed. What was most fun though, was animating our character to match the personality of each of the individual booths, because just trying to express that emotion in a comical form was a very interesting task.

Tuesday, April 5, 2016

New project: Dont press the red Button

Here's all the planning we are doing for a new project, where we are given the prompt "Don't press the red button" we are working with partners for this, and all the work has been distributed evenly. here is our plan for story and characters!


And here is our script!


INT - LABORATORY - DAY

We see a young rat, walking aimlessly towards a doorway. Seeing him on his way through is another rat, clad in a lab coat, holding a clip-board. Through a glass, the second rat can see everything the first rat will do in the next room, and we can infer that this an experiment.

The rat walks through and we see a shot of the room. There are three booth- like sections, each colored differently. We can see a stark darkness from behind a glass wall at the end of each booth. In front of the glass, is a counter housing two buttons.

Above the booths is a sign labeled: PICK ONE

The rat approaches the first booth. He presses one button, and a light turns on, revealing a small rabbit. This pleases the rat.

The rat approaches the second booth. He presses the button, and a light dispels the darkness, revealing an innocent cat. This puts the rat at ease.

When the rat reaches the third booth, he is greeted by a pair of menacing eyes, cutting through the darkness of the confine. A low growl can be heard from the other side. The rat, quivering in fear, decides not to press this button.

The other rat looks at his clipboard expectedly, and is seen scribbling something down.


FIN

Wednesday, March 23, 2016

Short day 5

Ive now animated birdman knocking down the door, and a few camera movements getting different scene angles, in addition to just preparing lots of parts of the scene to begin animating,

Short day 4

I added skeletons and figured out how to rig them to my characters. Ive added them to both my birdman and my animal thing, which will mkae it much easier to start animating.

Monday, March 21, 2016

Short day 3

Ive now added my birdman to the scene, and textured a lot of the things, playing around with what colors id want to see in the video. I also put in a few improvisational lights just to get a feel for the scene. I will soon attempt to rig birdman, but if i can't i won't, it isn't top on my priority list.

Friday, March 11, 2016

Short Story Day 2

Moving on to the next part, I modeled my character for the creatively-named Birdman. Not much to say here, just your average model, nothing extravagant. I will be importing him into the room along with Beardude tommorow

Thursday, March 10, 2016

Short progress day 1

Im starting my short project! I just finished modeling the environment, its going to start in a living room. I won't be doing much other than animating for a while, i still have like 3 more rooms and one character to make, I'll be rehashing an old model to save time.

Monday, March 7, 2016

Wednesday, March 2, 2016

Pop storyboard


Here is a storyboard I made for a short story we saw in class! it took way longer than it was supposed to (sorry mr. oualline) but i sorta like how it turned out. Luckily now, I'll have enough experience to make one for my own story!

Monday, February 22, 2016

2 in the AM PM Story analysys

I have been directed to analyze a short story animation of my choosing. I chose to look at 2 in the AM PM, which is a short done in college by J.G. Quintel, who, if you didn't know, went to create the show Regular Show.  here is link. Warning, it may be NSFW for language. It was the only short I could think of that had a distinct storyline going for it, sorry I didn't choose a more appropriate short.

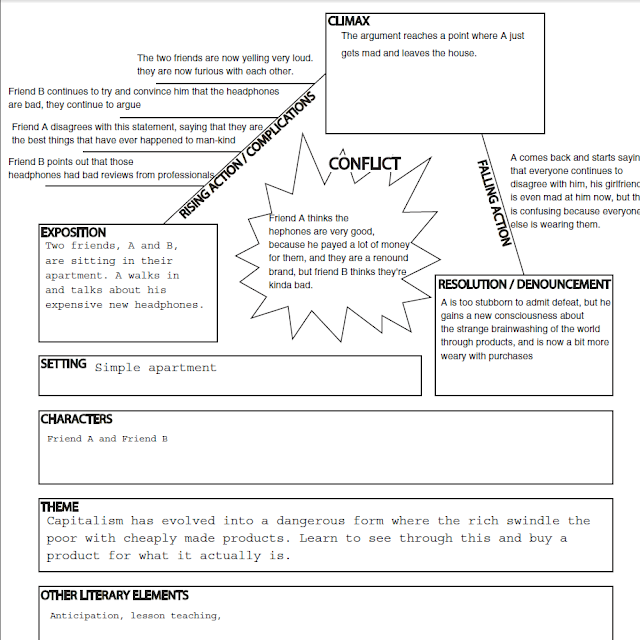
Also, here is my own plot diagram. we went through a process where we chose ten things we know to be tru, and making 2 of those things the base for our story. Of course, I was probably thinking too big for that part, and may have to resize my story to be a lot simpler. Here it is! 


Pirate flag done!


https://www.youtube.com/watch?v=7-CNs_wSPWo&feature=youtu.be


So i made a a pirate flag using nCloth Dynamics. It's pretty shabby, I had to redo it several times because a function that was supposed to work did not work.The Volume axis function crashed maya every time I so much as looked at it, so I rendered out the playblast without it. It was supposed to add a second layer of wind, but I think it looks the same without it honestly. Also i think i didn't add enough subdivisions, so i doesn't look as flappy as it should? I don't know. to atone for these mistakes, I put my flag on the moon, so that's cool. I think it turned out looking right though!

Thursday, February 18, 2016

Shatter effect


https://youtu.be/tyf1NSPu4m4

I have created my shatter video! I have done this by making a plane and just randomly making divisions with the multi cut tool, then adding a cloth and setting the ball as a collider, making the plane shatter when it goes through.

Wednesday, February 17, 2016

Vortex cube Finished


https://www.youtube.com/watch?v=9jLdLyfml6o&feature=youtu.be


Here's a finished product of the vortex dynamic thing that I made. It was pretty cool and I may use this effect in the future.

Tuesday, February 16, 2016

Vortex Dynamics

Starting to learn how to use a new dynamic, the vortex function! What supposed to happen is all the faces are supposed to sort of leave the cube and form a little tornado where the torus is, but unfortunately nothing is really working or making sense at the moment, but I'm sure as I go back through the tutorial and look at what is connected to what it will make sense.

Friday, February 12, 2016

The Rigging Crane is accomplished!


                                         https://www.youtube.com/watch?v=ZFSFPpXys5Y

I've finished my crane! it is now complete with three object compatibility! Here's a video of it!
Basically, the important part of this project was learning how to use constrains to our advantage, but at the beginning we learned some tools for rigging like using ik handles and creating joints!

Here's a close up of my crane btw:


Rigging day 4

So now I've completed getting my ball to land on my plate, by constraining it with a parent constraint to both the plate and the crane and keyframing when it will be contrained to either object. Now, I've contructed other shapes and am now in the process of figuring out how to get the crane to stack three shapes on top of each other, parenting the extra shapes to eachother instead of the plate.

Tuesday, February 9, 2016

Rigging, day 2

All right, so today i learned how to add joints to my crane, and how to set up my outliner to have different things parented to different things so that i know exactly what's moving what. For instance, the Ik Handle i added, which helps the crane to move all together as one entity, is a child to my locator, which i can use to control my whole crane by only selecting one thing. This stuff is fascinating but is always super buggy, and sometimes confusing. Can't wait to figure that out, but i'm sure it won't be anything too hard.

Monday, February 8, 2016

Rigging, day 1

I just started tutorials with rigging! although, i didn't really do anything rigging related, but i modeled this crane by following the video and am ready to put some sick joints in it

Friday, February 5, 2016

Soft Bodies

I'm now learning how to use soft bodies and it's very... interesting. Bascially, I learned how to brush on densities to certain areas, how to apply soft bodies, and how to apply springs. All of this can be found in either the fields/solutions tab or the nParticles tab.

Here's a playblasted video of what I have accomplished: (it's nothing pretty and it's kinda gross to look at but i think it's somewhat cool at least)
https://youtu.be/XTHVl7RBETU

Thursday, February 4, 2016

Candy bowl dynamics

https://youtu.be/5KfV8EdTbVw
So I made a new animation using dynamics. It's pretty much the same as the last one, except now i've learned how to duplicate the items and apply the rigid bodies/gravity solvers to more than one object.

https://youtu.be/CYHJo9eQXmI
also, using the next lesson, I used what i learned and turned my candy bowl into a catapult, which is nice. I guess i learned how to use memory caches but I couldn't find that on the settings and this version of maya seems to have that function built in already. However, I learned to set the initial state of the dynamics to start out in a position where it has already fallen, and alter it by moving the bowl.

Wednesday, February 3, 2016

Dynamics

https://youtu.be/7pMjIruB99I

I have now begun to work with dynamics, which I think are a crazy feature. I'm actually surprised no one has told me about this until now, it's probably the most useful feature I've used thus far. Basically, you set one object as a passive rigid body, which lets it not collide with active rigid bodies, i.e the ground. You can also throw in gravity now, that's a thing, it forces objects to fall, on their own, without animating them. it's pretty gnarly.

Deformer video

So heres the animation i did using deformers. The original shape is actually a torus that's been scaled up a bit. The deformers that are most prevalent are the flare and the twist, which give it a sort of tornado effect. theres also a squash in there that makes it look taller. As it moves along the deformer, the effect works on what ever shape is on it, which gives it its properties, and can make for some very interesting designs.

Tuesday, February 2, 2016

Deformer practice day 1

Im turning my shapes into an animation! Obviously, I chose the tornado looking one, because it would look the coolest in the end. It's pretty simple, so far I've just set movement key frames for the shape and it will move along the deformer.

Deformers

Here is a still of a couple shapes I've made using deformers. Deformers are a pretty nice tool, and can be used to make very simple shapes that would otherwise take a super long time to model. The instructions called for interesting shapes, so I used pretty much every deformer on 4 different shapes. Some turned out looking cooler than others. There once was a pyramid in there but the deformers did essentially nothing to it so i took it out

Friday, January 29, 2016

Final project render

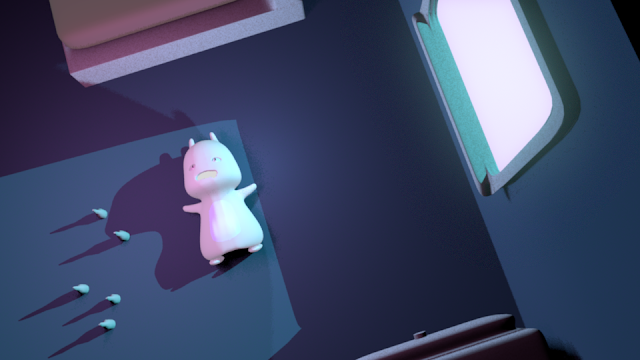
Here is the final product of my project! It looks a lot different from what I had originally planned, because of lots of problems with the settings. This project, all in all, was very fun. I learned a lot more about modeling than I had known before, and I can honestly say that I am more comfortable with it. I actually am not at where I am supposed to be actually. I was supposed to bring my product into mudbox and touch up/sculpt my model/room there, however there were a lot of bugs in maya that took whole work days to fix. By the time I had finished my character, I wanted to take him into mudbox, but then I decided that it would be smarter to model the room he was in first in order to get the positioning correct. By the time I actually finished the room, there wasn't much time to add more onto it, so I decided that there wasn't much I could change anyway, so I went straight into lighting. In this project, I am probably most proud of the way I lit up the scene, and all the colors I chose for both the character, the lights, and the room. Although I ended up doing an all right job, most of my problems came from modeling, and were mostly due to the fact that a lot of my models were messy. I'll practice making cleaner things in the future. Here is another draft of my scene before I had to play with the settings:

Day 11

I put in lights. Like a toooon of lights. Not really there's only three, but I had to mess with the settings for each one a lot in order for it to look right. There is a blue light shining down at his side from the window, and a pink area light filling the space to his left side. I thought the combination of those colors would look nice in the scene n add a sense of duality, and it also helps to heighten heighten his color. It almost has a late night 90's neon electro rave vibe because of this. Also, I added a more subtle area light to shine on the rest of the room, to sort of emphasize that nighttime feel, and also add a slight sense of grossness or groginess.

Tuesday, January 26, 2016

Day 9

Ive began to model furniture, and set a position for my character in my scene. Now that im moer confident in what my still will look like, i may bring it into mudbox soon.

Monday, January 25, 2016

Day 8

I started adding to my room after freaking out from seeing the tutorial put the model into mudbox with the room. So I put in a window and a door, and set many edge loops to round the room well.

Friday, January 22, 2016

Day 7

So it turns out that something wrong happened while saving, and it messed up my model. Like a lot. So i spent most of the day fixing it.  I also used that time to clean up a lot of the edges on my model, simplifying the shape to lower render time.

Wednesday, January 20, 2016

Day 6

My model is pretty much complete now! I put the two halves of his body together, essentially completing him. Many of the vertices were off, so I had to play around with them to make it look clean. If there is nothing else to do in the tutorials, I will be taking this into mudbox.

Friday, January 15, 2016

Day 5

I finished modeling his body and attached his arm. I learned more effeciant ways to combine points to more easily attach things like body parts or legs. I played around with smoothing out my model too. Still got a while to go!

Wednesday, January 13, 2016

Day three

Ive now finished the body of my character by moving points and adjusting them to see what kind of posture my character would have. I cut out some parts of the neck and connected them to the body, deleting some edges to even out the space between the head and the body.

New project! Day one.


Im starting a new project! Im making a still with an original character I made. he looks like a sort of bunny/ teddy bear thing. I finished his head and eyes!